Release Management 2015 and TFS Build 2015 Setup
Team Foundation Server (TFS)
I have been using the new build features in Team Foundation Server (TFS) 2015 for a couple months, and I must say its really nice to work with, much better than Windows Workflow. But that’s for another post. I want to explain the process for setting up and deploying with Release Management 2015 from TFS Build 2015. Currently, there is no build task built into TFS that allows you to deploy with Release Management (RM), so I am using the task that Daniel Mann created.
I am going on the assumption you have setup a build pool and agent and are ready to run a build. Or you already have a build. Be aware that the RM client needs to be installed on the build server for the task to work correctly.
First thing we need to do is to download the TFS Build Extensions Command Line Utility and install it. The documentation on the site works well when followed. If you run the command npm install -g tfx-cli and you get an error “npm is not recognized…” then you need need to download and run the Node.js msi file.
Now rerun the command to install the tfx-cli. Once you have that installed, you need to download and extract the Build Tasks.
Once you have the completed install, run the following command to verify the install worked – tfx help. This should present you with the command options.
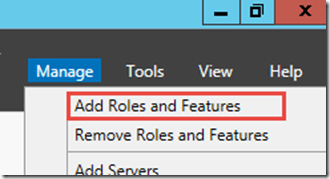
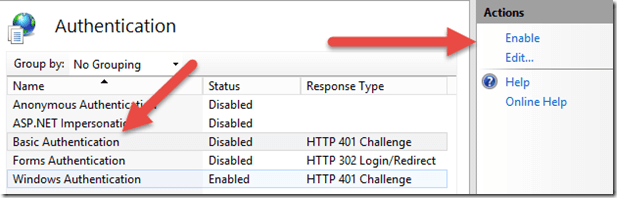
You need to be in the top level Agent Pool Administrators group to manipulate tasks – see here. Follow the steps to get the user added to the group. I also had to do one other thing that was not documented anywhere. I needed to set IIS to use basic authentication. Open the Server Manager and select the Manage > Add Roles and Features
When the dialog launches, go through until you get to the Roles screen. Now locate the Web Server (IIS) (Installed). Expand the section, locate the Security (Installed) and expand it. Check the Basic Authentication checkbox.
Click next.
Click next again, and then click Install. Once complete close the dialog window.
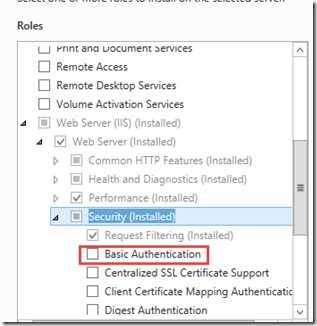
Now you need to set the TFS virtual directory to use basic authentication. To do so open the IIS Manager and expand the Team Foundation Server site. Click on the TFS virtual directory and then select the center window to Features View (tabs at bottom of window). Locate the IIS section and double click on the Authentication item.
Now select the Basic Authentication item. On the right side of the screen select the Enable link.
Now that we have that all set we need to login and upload the Incycle Build Task “RM Agent Release” to do so run the login command.
Open a command prompt and run tfx login –authType basic (make sure its lower case “basic”) – You need to use the authtype option if you are working with an on-premises TFS environment. Enter in the tfs collection you will be using, then your username and password.
Now that you are logged in, you need to upload the “RM Agent Release” task. In a command window enter tfx build tasks upload –taskpath .
Verify the task has been uploaded by running the tfx build tasks list command.
Scroll down the list until you see the following entry.
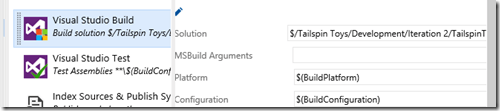
I am using the Tailspin Toys project so I have something to build. In reality, at this point I would have configured RM 2015 to do a complete deployment, but for this post I just want to show you how to fire off RM from TFS 2015 Build.
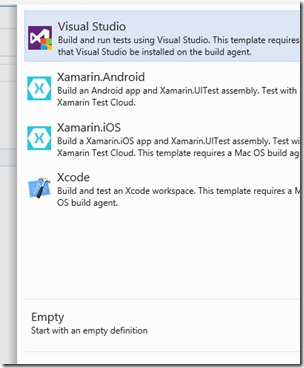
Now its time to create a build. Launch the TFS web portal and navigate to your project’s home screen. Now click on the Build link.
Once on the Build screen, click the green plus sign to create a new build definition. Select the Visual Studio template and click OK. If you do not have a solution to build, just select the Empty definition.
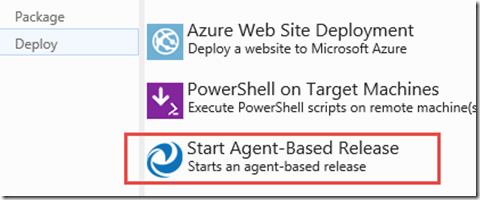
Now you need to add a build step. Select the Add build step… option.
The task is under the Deploy section. Select the Start Agent-Based Release. Click Add and then close the dialog window. image
Set up the build by selecting a solution to build and Save the build.
Now queue a new build and watch the console as it runs and wait for RM to kick off.